If you’ve ever wanted to share your Ohmni session with Zoom call participants, we’ve got you covered. By following the instructions below, you will be able to utilize third party software like Zoom and Loopback to achieve video conferencing-like, multi-party calls on Ohmni. This means all participants on your Zoom call will be able to see (via the screen share) Ohmni’s cameras and hear the audio from Ohmni’s side. Their voice will also be audible from Ohmni’s speaker.
Multi-party Calling Use Cases
How can you use multi-party calling with Ohmni?
Hospitals can offer multi-party calling to allow multiple family members to visit hospitalized patients at once. If family members live far away or the patient cannot otherwise receive visitors — which is the case during the coronavirus pandemic — then Ohmni can facilitate this interaction to provide comfort to the patient and alleviate isolation.
Museums and art galleries can provide virtual tours to a group using this feature. Avant Gallery, which has spaces in New York, Miami and Dubia, provides remote tours using the Ohmni telepresence robot. Using multi-party calling they can connect art lovers from around the world to visit their collection. At museums, robot museum docents can serve a similar purpose by exposing a group of virtual visitors at once.

The Ohmni® Robot, giving telepresence tours of Avant Gallery. Photo courtesy of Avant Gallery.
Ohmni users can also use multi-party calling to host virtual events such as graduations. BBT University in Japan used robots developed by Ohmni to host a virtual graduation ceremony. Due to COVID-19, students were unable to attend a ceremony in person so administrators showed the face of each student on the robot as their name was called providing the experience of walking across the stage and accepting their diploma without exposure risk. This was a creative way to recreate an event that would have otherwise been cancelled. Use the instructions below to host an event similar to this virtual graduation that needs more than one audience.

Robots developed by OhmniLabs used by BBT University in Japan. Source: BBT
Limitations
- Only the person that starts the Ohmni call will be able to control Ohmni and have their webcam image shown on the screen.
- We have only tested screen sharing to 2 other participants in addition to the Ohmni caller. It is possible that the call quality may reduce as you add more participants.
Requirements
- Familiarity setting up a video conference call using Zoom.
- A virtual audio software like Loopback.
- High bandwidth network to support both the Ohmni video call and a Zoom video call. At least 6 Mbps download and 6 Mbps upload dedicated.
Setup
All setup steps are done from the Ohmni caller’s computer. Other participants will just need Zoom software in order to join the Zoom video call for screen sharing.
If you don’t need the participants to be heard from the Ohmni side, skip directly to Step 5 to share your screen.

Step 1: Install Zoom
Please refer to Zoom’s website on how to setup and install the zoom software. You should be familiar with starting a zoom conference call and how to share your screen to the other participants.
Step 2: Install and setup Loopback audio
The Ohmni caller will need to install a virtual audio device on their computer in order to route the audio from Ohmni to all the participants and vice versa.
You can use any virtual audio software. The one we use is called Loopback, it is available only on Mac OSX. It is recommended that you buy the license otherwise the trial version will only work for 20 minutes.
After installing Loopback, open the software and add a new Loopback audio device with the following configuration.
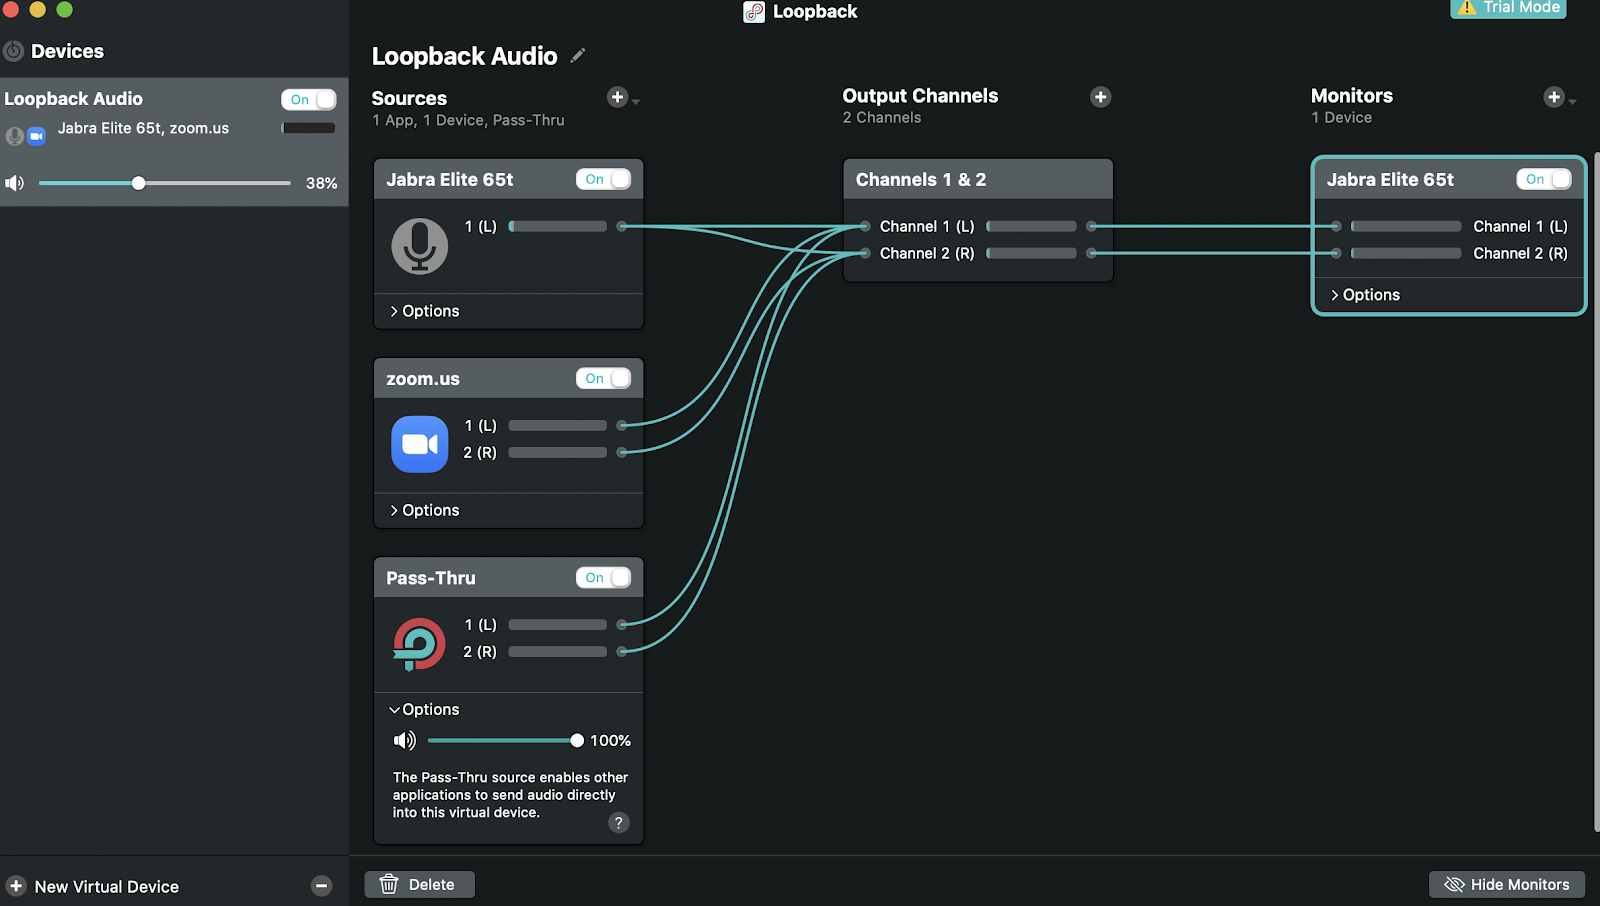
- The 1st source device should be your computer’s default mic input, in our case we are using a Jabra headset for input so it is set to that device.
- The 2nd source will be the Zoom application, this is to route all the audio from your Zoom session to and from Ohmni.
- The 3rd source called Pass-Thru is created by default, it is the virtual audio device that you will be using later on.
- Leave Output Channel as is.
- Add your default speaker/output device under Monitors. For us it is the same Jabra headset.
Step 3: Setup Ohmni
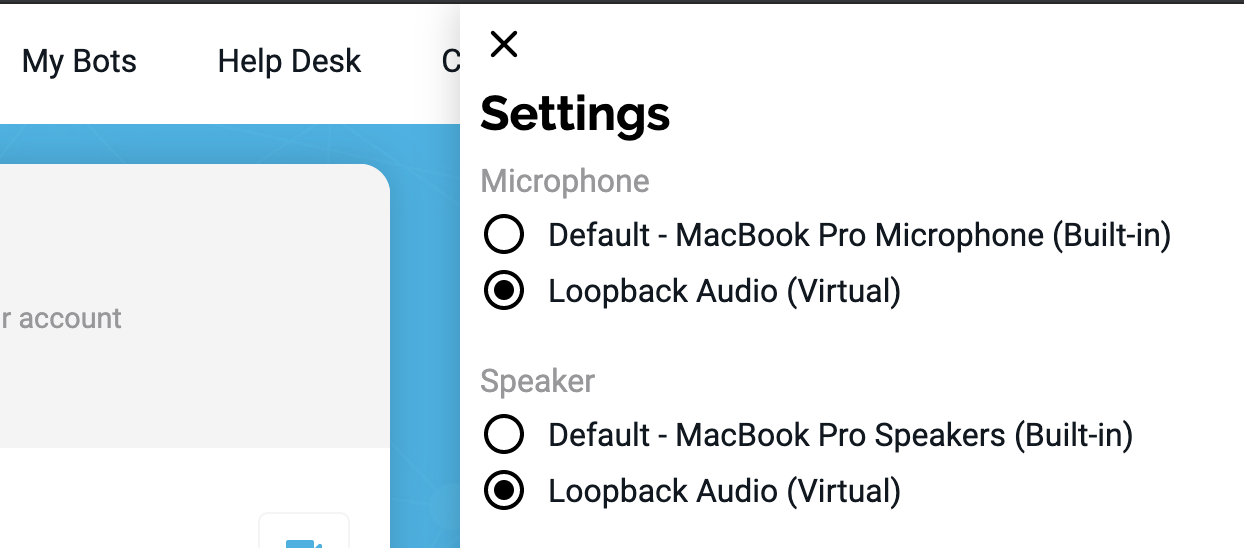
From the Ohmni web application dashboard, click Settings from the top menu bar and click “Loopback Audio (Virtual)” as both Microphone and Speaker.
Step 4: Launch a Zoom call and setup audio
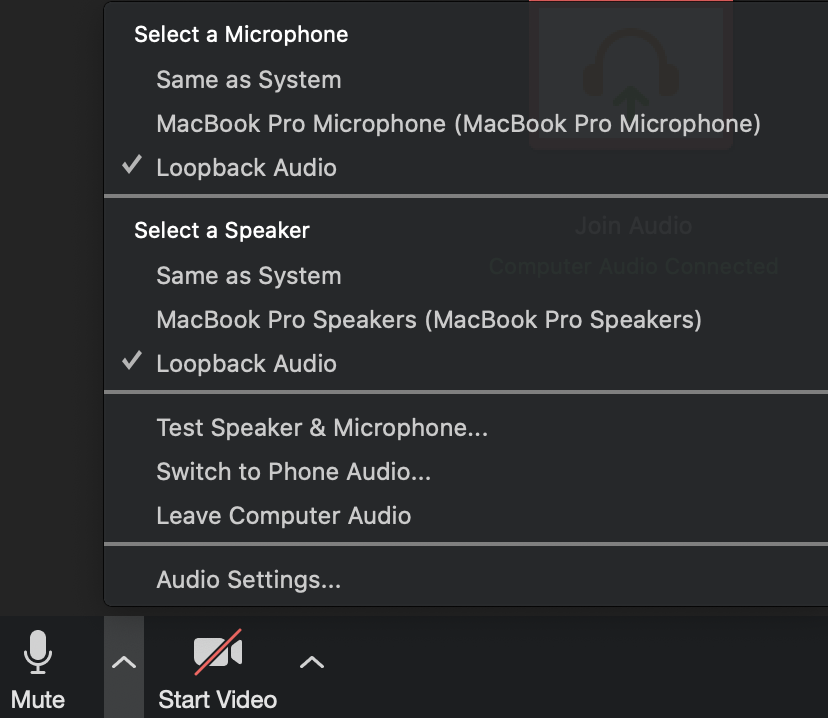
- Launch a Zoom video call
- Under your Audio option, select “Loopback Audio” for both Microphone and Speaker.
- No other setup is required for other participants, they will join the zoom session normally.
Step 5: Call into Ohmni
- Go back to the Ohmni web application in your browser window and dial into Ohmni
- Switch to your Zoom window and click “Share”
- Select the Ohmni video call window to share
Congratulations! If you followed the steps up to this point, you should have successfully shared your Ohmni session with your Zoom call participants. All participants will be able to see (via the screen share) Ohmni’s cameras and hear the audio from Ohmni’s side. Their voice will also be audible from Ohmni’s speaker.
Ready to explore multi-party calling with Ohmni? Click here to visit our store.

